How to measure for a glass splashback
How To Measure For a Glass Splashback
Glass Splashbacks are a stunning, easy to clean, "expensive" kitchen or bathroom wall covering...but they do not have to be. As the authority on DIY Splashbacks, we show you how to measure, we show you how to fit, we show you how to save a fortune and order direct from us- the manufacturers.
For most kitchens, measuring and fitting a glass splashback is as easy as measuring a rectangle and gluing it to the wall. Other kitchen can be trickier but we are here to guide you every step of the way.
Rectangular Splashbacks
.png) The diagram pictured here shows the specific measurements required for a simple rectangular glass kitchen splashback.
The diagram pictured here shows the specific measurements required for a simple rectangular glass kitchen splashback.
Height measurements B and D- as not all cooker hoods an worktops are fitted level there can be a small variation between these two measurements. If this variation is less than 2mm, should you wish to keep it simple just stick to the shortest measurement. If though you would like a neater fit we just need a drawing showing the run off or taper butessentially just measure the height at both sides to be sure.
Width Measurements A and C- as with the height there can sometimes be a very slight variation in the width at the top, and width at the bottom. It's always worth checking to be sure.
Allowance for expansion and glass size tolerance- most kitchens are made from some form of wood which will expand and contract over time depending on conditions in your house (moisture content in the air an temerature). To allow for these ever so slight variations just deduct 2mm from measurements A, B, C and D. If you do not do this, and your glass is a tight fit, should your kitchen units expand even 1mm the glass will break.
How to measure around worktop upstands or corners

Next two more, this time 2mm inside each wall unit down to the upstand. The outer lines are the widths for the top section and the inner lines the widths for the bottom section.
For the heights then draw a vertical line straight across your upstands and measure this line to the cooker/worktop, this is the height of the inner bottom section.
The outer section is simply the height of the two outer lines and subtract 3mm (for expansion).
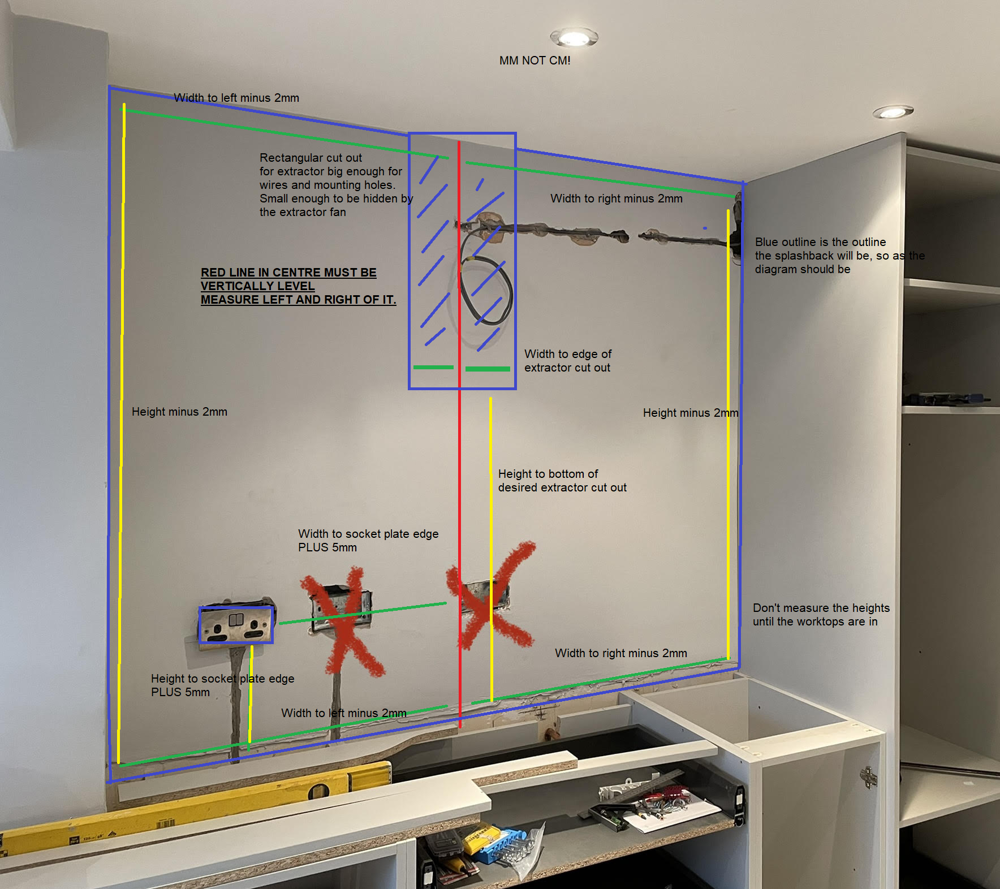
How to measure for a splashback to fit behind an extractor fan

How to measure for an upside down T or any other complicated shape

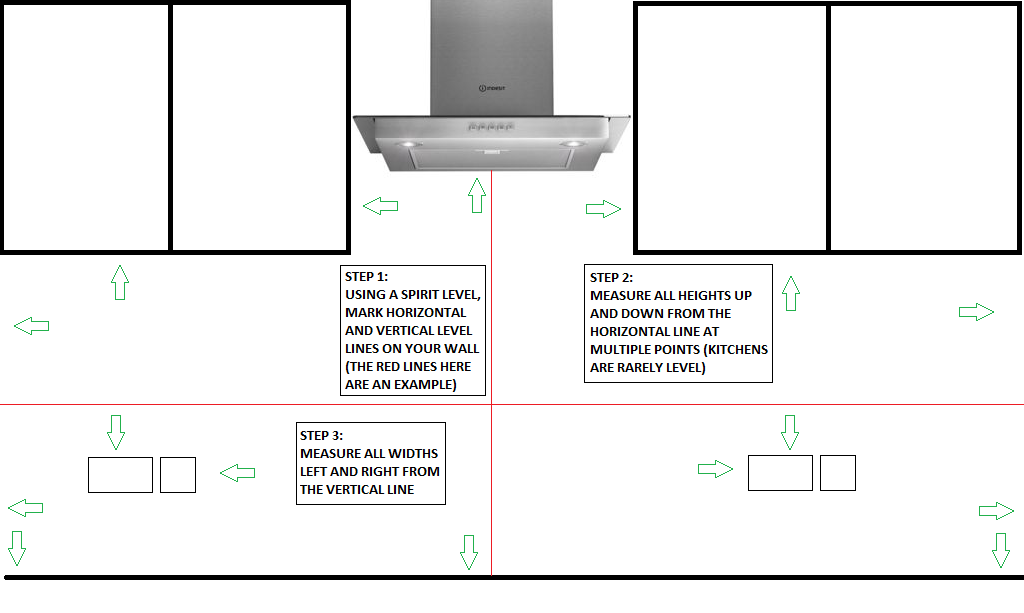
From measuring and fitting glass splashbacks ourselves for years we have found the simplest way by far to measure for an upside down T, socket cut outs or any shape at all (yes even what looks like a rectangle) is as follows.
1) Using a spirit level, mark a level horizontal line and a level vertical line on your wall. Where it is does not matter but in the middle of the space you are covering is simplest so long as you do not intersect cut outs.
1b) If you have tiles or there is a reason why you cannot mark the wall, use a laser level but you will probably also need a tripod to mount it). Just be careful not to bump into it or move it once you start (mark reference points on the wall so if you do move it you can reset it again to the same spot)
2) Measure all your heights, so if below the horizontal line measure down, if above measure up. (this means if your worktop and/or units are not level it does not matter...and they are never level!) Do this at all ends/edges (one end of wall unit to the other etc.)
3) Measure all your widths from the vertical line, right and left. Again, this allows for walls running off etc. Do this at all ends/edges (one end of wall unit to the other etc.).
Deduct 2mm from each width from edge to centre line (so 4mm deduction overall)- this is for expansion and tolerance as there is a 2-3mm tolerance in all glass products.
4) Allow for expansion and glass size tolerance, deduct 3-4mm from all your heights between worktop and units or worktop and cooker hoods.
5) For electrical sockets, you want the socket plate to fit OVER the cut out, so the cut out should be 10mm smaller. So the nearest measurement to near side of socket ADD 5mm, to the far side SUBTRACT 5mm. Same for vertical measurements (i.e. you are measuring 5mm inside the socket all the way around).
6) Where you have an internal corner you must allow for the internal radius...what is an internal radius? Basically our shaped splashbacks are cut by a CNC which is a computer controlled router, our CNC has a 12mm router bit (drill bit) so there is a 6mm radius (rounded corner). To allow for this you need to account for the 6mm, we recommend deducting an additional 4mm from the heights under your wall units. (you have already deducted 3-4mm so you've allowed 7-8mm in total then).
Our splashbacks can sit on the worktop, or 2-3mm off and sealed with our sealant. SO...if you find you have more than enough space to cater for the internal radius and the gap under the units is too much simply lift the splashback off the worktop with spacers, allow the adhesive to dry, remove the spacers and seal.
It really is that simple, no matter how complicated the shape if you apply the crosshair method detailed above and take your time you can measure any shape or space with accuracy!
