RSS

Blog posts of '2025' 'October'

Splashbacks Beyond the Kitchen: Creative Applications in Bathrooms and Utility Spaces

Splashbacks Beyond the Kitchen: Creative Applications in Bathrooms and Utility Spaces

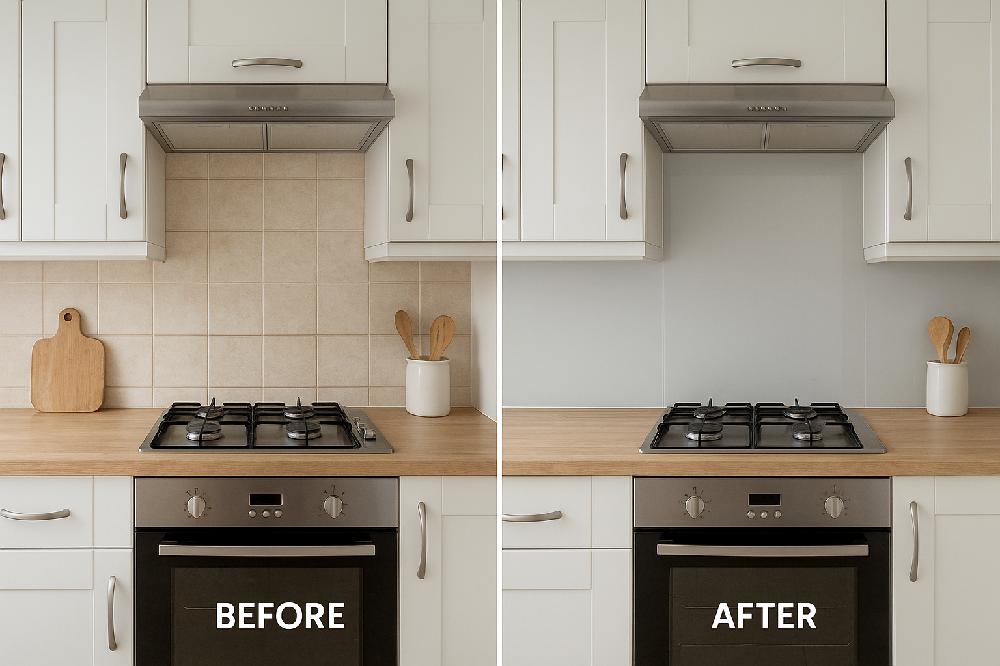
In today’s design-driven world, splashbacks have transcended their original role as kitchen protectors. They’ve evolved into versatile design elements, reshaping how we approach interiors with both practicality and aesthetic value. While kitchens remain their natural habitat, splashbacks are increasingly finding new homes — in bathrooms, laundries, and even utility areas — where durability meets design ingenuity.


1. Bathroom Elegance Reinvented

Bathrooms are no longer purely functional zones; they’ve become personal retreats. Installing a glass or acrylic splashback behind the sink or bath instantly elevates the space. Beyond adding a touch of luxury, they safeguard walls against water damage and mold — a crucial win for longevity.

For instance, DIY Splashbacks offers bespoke glass options that merge style with hygiene, thanks to easy-to-clean surfaces and seamless edges that resist grime buildup.


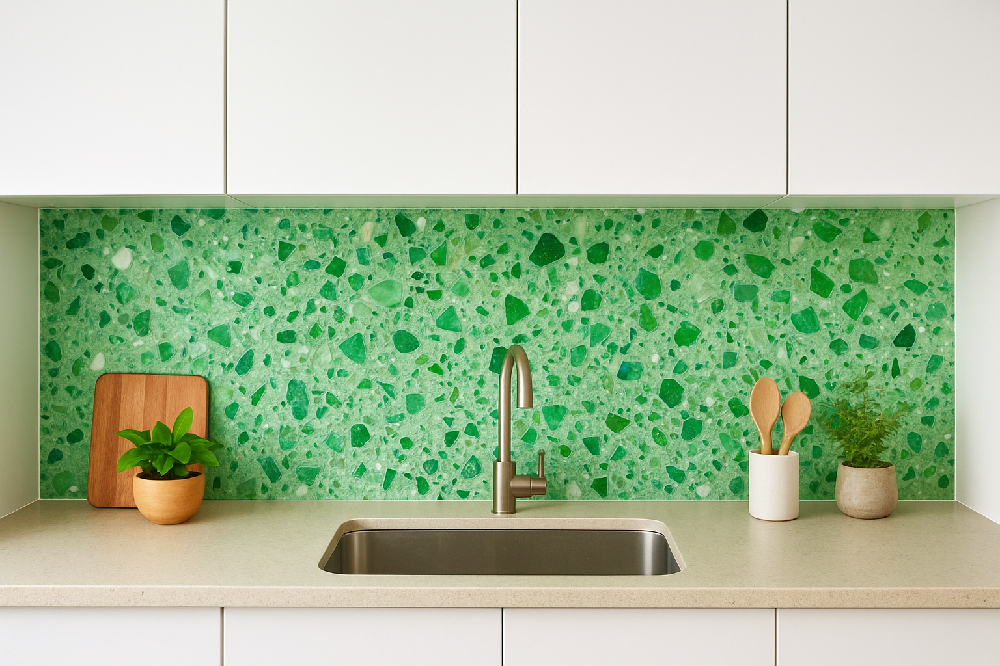
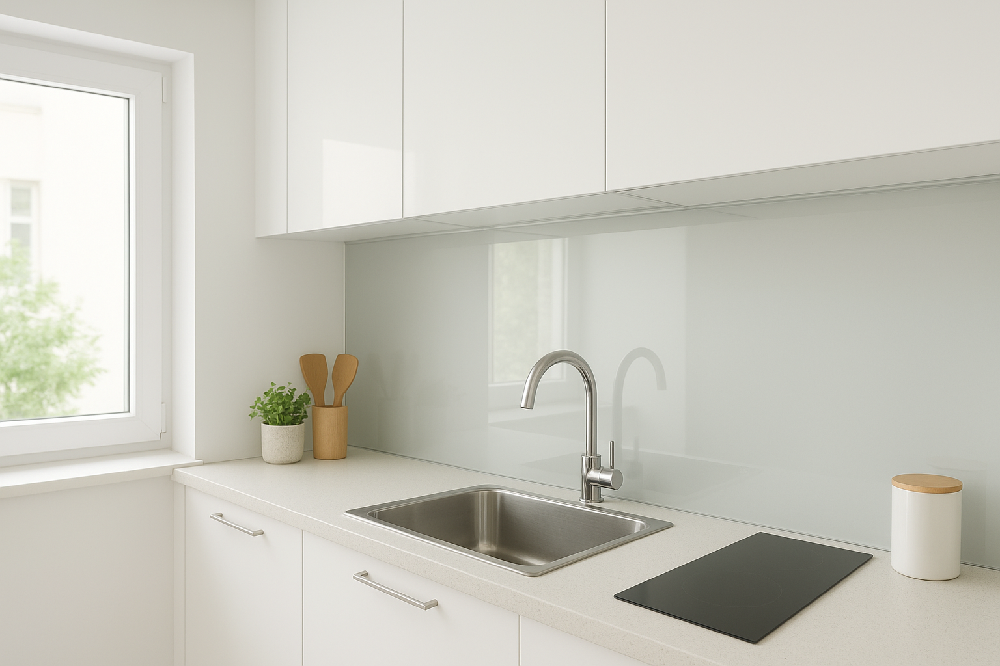
2. The Utility Room Upgrade

Utility areas often get overlooked in the home design conversation. Yet, they endure heavy-duty use — water splashes, detergent stains, and scuffs. Introducing a toughened glass or acrylic splashback not only modernizes the space but also enhances cleaning efficiency. Choose a neutral or mirrored finish to reflect light and make smaller rooms appear larger — a subtle design strategy that maximizes function without sacrificing form.


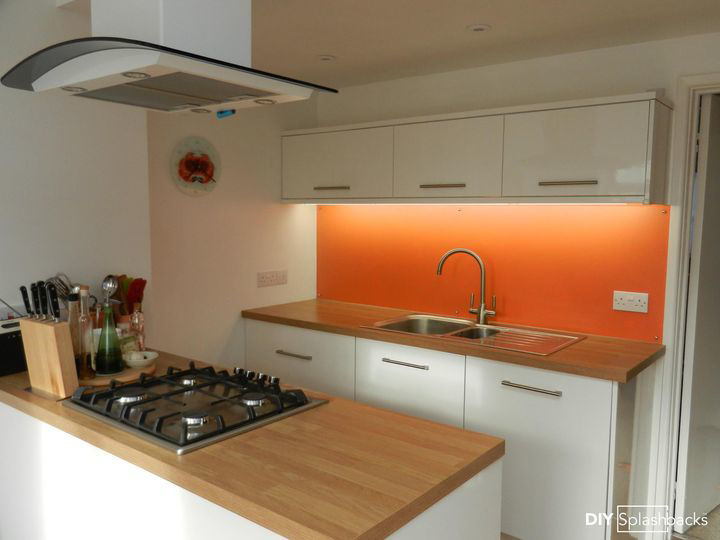
3. Creative Extensions in Unexpected Spaces

Think beyond the conventional. Splashbacks can redefine home bars, dressing tables, or craft corners, bringing cohesion across interior styles. A colored glass panel behind a vanity mirror, for example, can create a sophisticated contrast, while a printed design can add visual flair to otherwise plain walls. The versatility of materials allows homeowners to integrate splashbacks seamlessly across diverse zones — aligning with both modern minimalism and traditional warmth.


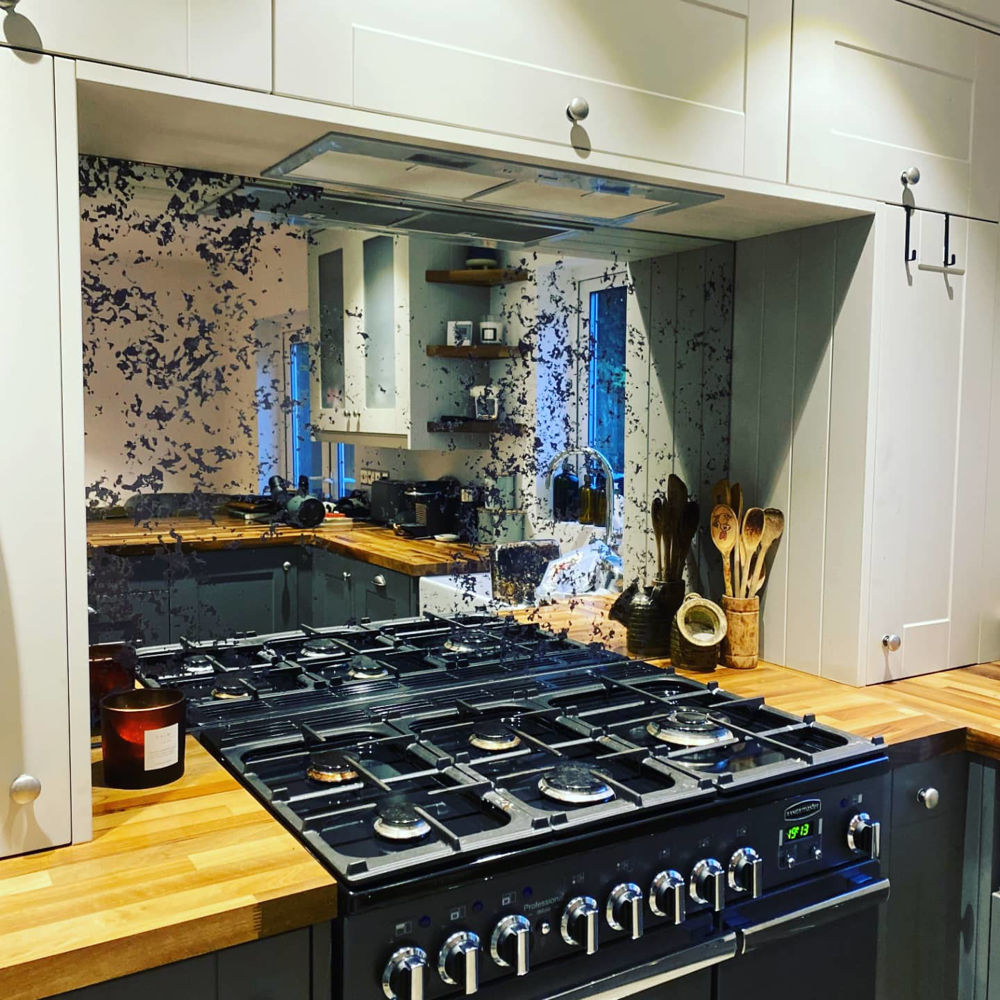
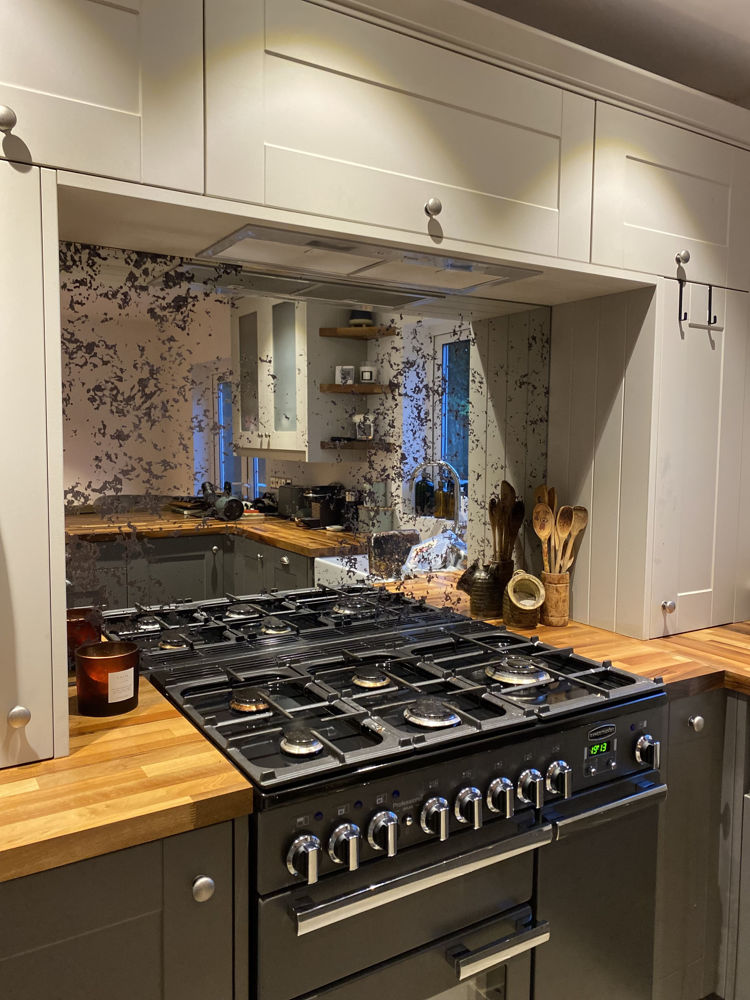
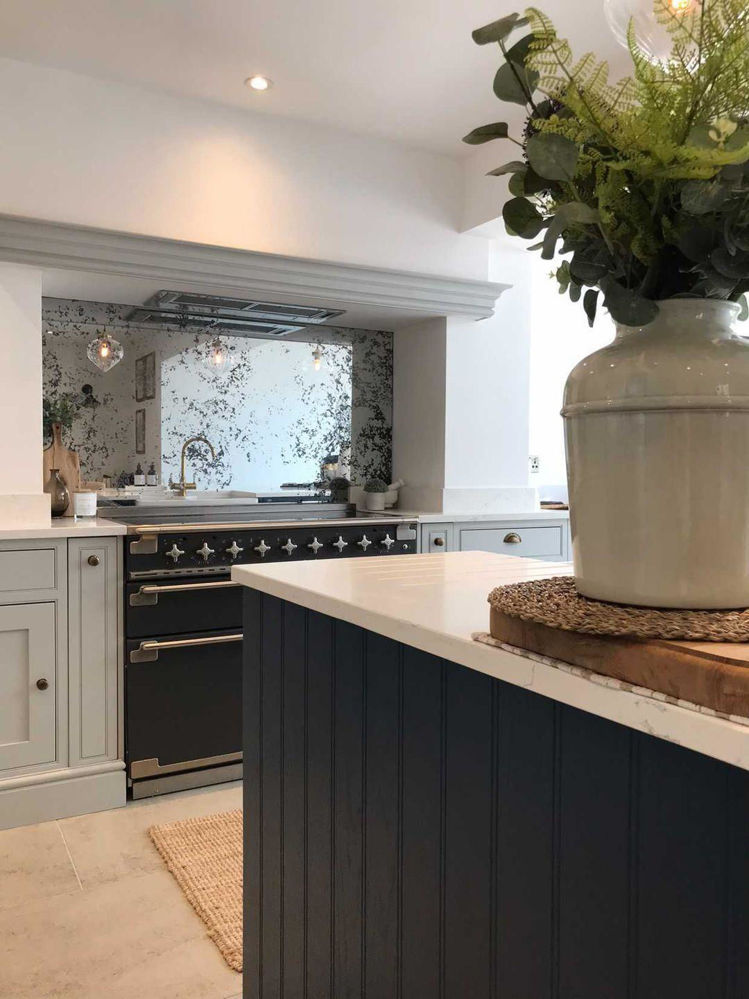
4. Material Innovation: Durability Meets Design

Acrylic, glass, and even mirrored splashbacks have advanced technologically, making them heat-resistant, easy to install, and highly customizable. Their adaptability makes them an intelligent alternative to tiles, particularly where seamless finishes and easy maintenance are non-negotiable. The ability to choose exact sizes, finishes, and colors from trusted suppliers like DIY Splashbacks ensures that every application aligns perfectly with the homeowner’s aesthetic vision.


Final Thoughts

The modern home calls for flexible, durable, and visually cohesive design elements — and splashbacks deliver all three. Extending them beyond the kitchen is not just a design choice; it’s a strategic lifestyle upgrade that enhances every corner of your space.

Splashbacks for Small Spaces: Maximizing Tiny Kitchens or Bathrooms with the Right Designs

Splashbacks for Small Spaces: Maximizing Tiny Kitchens or Bathrooms with the Right Designs

In the evolving landscape of modern interiors, every inch counts — especially in small kitchens and bathrooms. Splashbacks, once a purely functional element, have become a strategic design feature for amplifying space, enhancing light, and defining character. Let’s explore how the right splashback can make your compact area feel open, stylish, and efficient.


1. Light Reflection: The Illusion of Space

When working with limited square footage, light is your best ally. Glass splashbacks, for instance, reflect both natural and artificial light, creating a sense of depth and openness. Opt for high-gloss finishes or mirrored splashbacks to bounce light around your room, instantly making it feel larger.

Explore stunning options at DIY Splashbacks, where you can customize reflective glass to perfectly match your room’s aesthetic.


2. Strategic Color Choices

Color can redefine perception. Soft neutrals and light tones — think whites, pastels, or light greys — open up spaces visually, while bold hues can add dimension when used sparingly. For a timeless yet contemporary touch, consider colored glass splashbacks that introduce vibrancy without overwhelming the room.

Check out DIY Splashbacks’ custom color options to achieve a seamless look that aligns with your palette.


3. Minimalism Meets Functionality

Small spaces thrive on simplicity. Frameless designs, clean lines, and minimal grout ensure a clutter-free finish. Acrylic splashbacks are especially advantageous here — lightweight, easy to install, and sleek in appearance. They provide a high-end look without the weight or cost of tiles.


4. Maximizing Vertical Real Estate

A creative way to make your room feel taller is by extending your splashback to the ceiling. This technique draws the eye upward, elongating the visual plane. It’s particularly effective behind sinks or stoves, where it doubles as a protective wall feature.


5. Smart Integration with Fixtures

When working in a small bathroom or kitchen, alignment matters. Coordinate your splashback with fixtures, cabinetry, and countertops to achieve harmony. Integrated lighting under cabinets can further enhance the reflective quality of your splashback, creating depth and sophistication.


Final Thoughts

Splashbacks aren’t just decorative; they’re design amplifiers. In tight spaces, they hold the power to transform perception, functionality, and overall flow. Whether you choose glass, acrylic, or mirrored finishes, investing in the right splashback can truly maximize your small kitchen or bathroom with minimal effort and maximum impact.


Eco-Friendly Splashbacks: Sustainable Choices for a Greener Home

Eco-Friendly Splashbacks: Sustainable Choices for a Greener Home

In an era where sustainability drives innovation, the kitchen has become a stage for eco-conscious design. Homeowners are rethinking every element — and the splashback is no exception. Choosing an eco-friendly splashback is not just a design decision; it’s a commitment to a greener lifestyle that merges aesthetic appeal with environmental responsibility.


1. The Rise of Sustainable Design in Modern Homes

Sustainability has shifted from trend to necessity. Consumers are prioritizing materials that last longer, waste less, and can be recycled. The kitchen, being the most active space in any home, offers countless opportunities to make environmentally friendly choices — starting with the splashback.


2. Recycled and Recyclable Materials

Modern splashbacks are available in materials that promote circular use. Recycled glass and acrylic options not only reduce landfill waste but also maintain the premium look homeowners desire. These materials are durable, low-maintenance, and can be reprocessed at the end of their lifecycle — a true win for sustainable design.

For instance, DIY Splashbacks offers high-quality glass and acrylic splashbacks that combine longevity with low environmental impact. These options allow you to design beautifully while supporting a cleaner planet.


3. Energy-Efficient Production

Today’s manufacturing processes for eco-friendly splashbacks use less energy and fewer harmful chemicals. Many modern glass and acrylic suppliers employ UV-cured printing techniques and water-based adhesives, which minimize emissions without compromising quality or vibrancy.


4. Durability Equals Sustainability

Longevity is a cornerstone of eco-friendly design. A well-made splashback can last decades, reducing the need for frequent replacements. Materials like toughened glass and premium acrylic resist scratches, stains, and heat — minimizing waste over time.


5. Aesthetic Meets Accountability

Gone are the days when sustainable meant “plain.” Now, eco-friendly splashbacks come in a vast range of colors, finishes, and designs, from bold modern prints to elegant minimalist tones. Homeowners can make ethical design choices without sacrificing beauty or functionality.


Final Thoughts

Choosing an eco-friendly splashback is a simple yet powerful way to align your home with your values. It reflects a mindset that values durability, quality, and sustainability — the core principles of modern interior design.

If you’re ready to transform your kitchen responsibly, explore the sustainable design options available at DIY Splashbacks — where timeless style meets environmental innovation.

Mirror Splashbacks: Expanding Light, Space, and Luxury in 2025

Mirror Splashbacks: Expanding Light, Space, and Luxury in 2025

In the ever-evolving landscape of interior design, the mirror splashback is emerging as a game-changer — a design move that captures timeless elegance while delivering modern utility. Once seen primarily in luxury kitchens, mirror splashbacks are now moving into mainstream adoption thanks to innovative materials, easy maintenance, and undeniable visual appeal.


The Power of Reflection

Mirror splashbacks do more than look beautiful — they transform perception. By reflecting light, these installations instantly make any room appear larger and brighter. Whether it’s a compact apartment kitchen or a minimalist bathroom, the mirror surface amplifies space, making it feel open and airy.

Beyond optics, reflective surfaces provide a visual rhythm that harmonizes with surrounding textures — wood, stone, or high-gloss cabinetry — creating an equilibrium between sophistication and warmth.

For homeowners seeking this transformative effect, DIY SplashbacksMirror Collection offers precision-cut, toughened glass options that merge beauty with durability.


Material Innovation Meets Tradition

Traditionally, mirror finishes have been associated with fragility and high upkeep. Today’s versions, however, leverage toughened safety glass and heat-resistant coatings designed to withstand the rigors of daily cooking.

DIY Splashbacks’ toughened mirror glass splashbacks embody this modern evolution — engineered for safety behind cookers and built for longevity. This innovation honors traditional craftsmanship while embracing technological refinement.


Aesthetic Versatility

Mirror splashbacks are available in a variety of finishes, each setting a distinct tone:

Classic Silver: For timeless brightness and clean reflection.

Bronze or Grey Tint: To introduce warmth and depth — perfect for traditional interiors.

Antique Mirror Finish: For character-rich spaces that evoke heritage and artistry.

Whether your design leans modern or vintage, a mirror splashback delivers visual continuity — tying together appliances, cabinetry, and lighting in one cohesive statement.


Functional and Easy to Maintain

While luxury often demands maintenance, mirror splashbacks defy that rule. They’re smooth, non-porous, and simple to clean — a quick wipe keeps them spotless.

More importantly, they resist stains and splashes far better than porous tile grout.

For professionals or DIY enthusiasts, installation is streamlined — DIY Splashbacks provides step-by-step guides and custom-cut services that make it accessible for any skill level.


Design Integration Ideas

Under-Cabinet Lighting: Enhances the mirror’s reflection and adds ambient glow.

Contrasting Textures: Pair with matte cabinets or natural stone for balance.

Full-Wall Coverage: Use from countertop to ceiling for a seamless, high-end aesthetic.

These installations merge heritage design principles — symmetry, light, proportion — with contemporary minimalism, making mirror splashbacks an ideal bridge between old and new.


Why They’re Trending in 2025

The current design movement values space optimization, light play, and sustainable luxury. Mirror splashbacks embody all three:

They maximize light without energy use.

They create perceived space in smaller areas.

They elevate style without heavy remodeling.

As more homeowners prioritize sleek, functional upgrades, mirror splashbacks will continue defining modern kitchens and bathrooms in 2025.


Final Remarks

The mirror splashback stands at the intersection of classic elegance and modern practicality — a design that reflects both style and sensibility. Whether you’re upgrading a compact kitchen or redefining a luxury space, this choice speaks of refinement, light, and timeless design continuity.

For homeowners and professionals alike, mirror splashbacks are more than a surface — they’re a statement.

Smart Splashbacks: The Future of Kitchen Design

Smart Splashbacks: The Future of Kitchen Design

In today’s fast-evolving interior design landscape, kitchens are no longer just cooking zones — they’re innovation hubs. The humble splashback, once purely functional, has now stepped into the future. Smart splashbacks are redefining what it means to combine practicality with digital sophistication.

1. The Rise of Intelligent Design

Smart splashbacks are the next wave in kitchen technology. Picture a sleek glass surface that not only protects your walls from splashes but also integrates LED lighting, touchscreen controls, and built-in displays. These high-tech solutions allow homeowners to manage lighting moods, play recipes, or even stream content while cooking. It’s design and utility—merged seamlessly.


2. Touch and Glow: The Power of LED Integration

LED-backlit splashbacks have become a hallmark of modern kitchens. They provide energy-efficient illumination that enhances both style and visibility. With programmable color schemes and dimming functions, users can shift from bright cooking light to soft ambient glow with a simple touch. For a customizable range of designs, explore glass splashbacks from DIY Splashbacks.


3. Hygiene Meets Technology

Post-pandemic design thinking has emphasized cleanliness, and smart splashbacks are leading the charge. Some models now include antimicrobial coatings and easy-clean surfaces that resist bacteria and grime. Combine that with the non-porous nature of acrylic or glass materials, and you get a hygienic solution that’s as futuristic as it is functional. Discover more options in acrylic splashbacks.


4. Customization and Connectivity

Today’s smart kitchens are connected ecosystems. Integrating a splashback with your home automation system means you can control lighting, temperature, or even music right from your wall. Add in custom designs, digital prints, or mirrored finishes, and your splashback becomes a personalized statement piece. Learn how to tailor yours with custom splashbacks.


5. Looking Ahead

The smart splashback trend is more than a fad—it’s the beginning of interactive kitchen environments. As technology advances, expect to see augmented-reality cooking assistants, voice-activated panels, and even eco-responsive materials. The kitchen wall is no longer passive—it’s part of your smart home experience.


Final Remarks

In essence, smart splashbacks represent the intersection of innovation and tradition — combining the timeless need for protection and style with cutting-edge technology. They’re not just upgrades; they’re strategic investments in the future of interior design. Whether you’re remodeling your kitchen or building a new one, a smart splashback offers a powerful way to future-proof your space while maintaining that sleek, polished look that defines modern living.

Waterproofing Behind Your Splashback: Essential Tips

Waterproofing Behind Your Splashback: Essential Tips

When it comes to kitchen and bathroom design, a splashback does more than add visual flair — it’s a barrier that protects your walls from moisture, grease, and grime. However, one commonly overlooked detail is waterproofing behind the splashback. Without proper waterproofing, even the most beautiful glass or acrylic splashback can’t prevent long-term water damage. Here’s how to ensure your installation stands the test of time.


Why Waterproofing Matters

Water and porous surfaces don’t mix. Over time, moisture can seep behind your splashback, leading to:

Mould growth and dampness

Wall deterioration

Discoloration or peeling paint

Compromised adhesion of the splashback

Proper waterproofing creates a sealed environment, safeguarding both the wall and the splashback material — especially in areas like behind sinks, stoves, and shower enclosures.


Step 1: Choose the Right Substrate

Before applying any splashback, ensure the wall is:

Flat, clean, and dry

Free from cracks or flaking paint

Made of a moisture-resistant material, such as cement board or waterproof plasterboard

If you’re using MDF or standard plasterboard, apply a waterproof primer or membrane sealant to prevent moisture penetration.


Step 2: Apply a Waterproof Membrane

A liquid waterproofing membrane is a smart investment. Brush or roll it onto the wall behind where the splashback will sit, especially around high-moisture zones like sinks or cooktops. Allow it to dry completely before moving to the next step.

For added protection, seal corners and edges with a waterproof tape or silicone barrier.


Step 3: Use the Correct Adhesive

Not all adhesives are created equal. For glass, acrylic, or aluminium splashbacks, use neutral-cure silicone or specialist splashback adhesive that’s waterproof and heat-resistant. Avoid acidic silicones — they can damage mirrored or coated surfaces.

DIY Splashbacks offers a range of high-quality materials designed for easy, watertight installation — visit DIY Splashbacks to explore adhesive recommendations that match your chosen splashback type.


Step 4: Seal the Edges

Once your splashback is securely in place, seal all exposed edges using a clear or colour-matched waterproof silicone. This step prevents water from sneaking behind the panel.

Focus particularly on the bottom edges (where the splashback meets the countertop) and the side joints near walls or cabinetry.


Step 5: Conduct a Final Check

After sealing, allow the silicone and adhesive to cure fully (usually 24–48 hours). Test by running a small amount of water along the sealed edges to ensure no leaks occur.


A Waterproof Future

A splashback may be the star of your kitchen or bathroom design, but waterproofing is the unsung hero that keeps everything in top shape. Investing a little time in proper sealing ensures your walls remain dry, your splashback stays secure, and your home retains its polished look for years to come.


Related Reading on DIY Splashbacks

How to Fit an Acrylic Splashback at Home

Best Materials for Kitchen Splashbacks

Dealing with Splashback Stains: Common Issues and Solutions

Dealing with Splashback Stains: Common Issues and Smart Solutions

Dealing with Splashback Stains: Common Issues and Smart Solutions

A pristine splashback doesn’t just elevate your kitchen’s aesthetic — it also plays a pivotal role in keeping your cooking space hygienic and easy to maintain. But over time, even the most durable splashbacks can fall victim to stains, smudges, and discoloration. Whether you have glass, acrylic, or stainless steel, knowing how to deal with common splashback stains ensures your kitchen stays spotless and stylish.

Let’s explore the main culprits and how to tackle them like a pro.


1. Grease and Oil Build-Up

The Issue: 

Grease splatters are inevitable, especially around the hob or oven area. Over time, they harden into a sticky film that dulls your splashback’s shine.

The Solution:

Use a soft cloth with warm water and a few drops of mild dish soap. For glass splashbacks, you can use a vinegar-water mix for extra sparkle. Avoid abrasive sponges or strong chemicals that can scratch or damage surfaces.

Pro Tip: Installing an easy-to-clean glass splashback can significantly reduce cleaning time and maintain a glossy finish for years.


2. Water Marks and Limescale

The Issue:

Hard water leaves behind mineral deposits, especially noticeable on reflective surfaces like mirrored or crystal splashbacks.

The Solution:

Wipe regularly with a microfiber cloth and a solution of equal parts white vinegar and water. For stubborn spots, apply a small amount of lemon juice — nature’s own limescale fighter.


3. Food and Sauce Splashes

The Issue:

Tomato sauce, curry, and spices can stain lighter splashbacks if not cleaned promptly.

The Solution:

Act fast — wipe spills immediately with a damp cloth. For set-in stains, use a non-abrasive cleaner designed for the specific material of your splashback. Acrylic surfaces, for instance, need gentler treatment than stainless steel.

Related Tip: Consider coloured acrylic splashbacks for kitchens that face heavy use; they combine vibrant style with practical stain resistance.


4. Heat Discoloration

The Issue:

Splashbacks installed behind cooktops can develop discoloration over time due to heat exposure.

The Solution:

Opt for heat-resistant materials such as toughened glass or aluminium composite panels. If your current splashback is discoloured, professional polishing or replacement may be the best course of action.

For long-term protection, explore custom splashback options that combine durability with design flexibility.


5. Fingerprints and Smudges

The Issue:

Glossy splashbacks, while elegant, are prone to visible fingerprints and streaks.

The Solution:

Use a soft microfiber cloth and a glass cleaner for quick touch-ups. For acrylic or mirror finishes, an anti-static spray can reduce future marks.


Final Thoughts

Maintaining a spotless splashback isn’t just about cleanliness — it’s about preserving your kitchen’s character. Regular upkeep, the right cleaning techniques, and choosing quality materials make all the difference.

If you’re looking to upgrade to a low-maintenance, high-impact option, browse the full range of designs at DIY Splashbacks. From modern glass to custom-printed panels, you’ll find the perfect solution for your kitchen’s needs.


Related Reads:

5 Signs It’s Time to Replace Your Kitchen Splashback

How to Measure a Splashback Area Yourself

Small Kitchen? How Splashbacks Can Make Your Space Look Bigger

5 Signs It’s Time to Replace Your Kitchen Splashback

5 Signs It’s Time to Replace Your Kitchen Splashback

Your kitchen splashback is more than just a decorative element — it protects your walls from moisture, grease, and daily wear and tear. But over time, even the best splashbacks can start showing signs of age. Recognizing when to replace yours can help maintain both the beauty and functionality of your kitchen.


1. Visible Cracks or Damage

Cracks, chips, or dents are clear indicators that your splashback has reached the end of its life. These imperfections not only spoil the look of your kitchen but can also allow water to seep through, leading to mould and wall damage. If you notice these issues, consider replacing your old splashback with a durable and modern alternative such as a glass splashback or acrylic splashback for a sleek finish.


2. Outdated Design or Colour

Kitchen styles evolve over time, and what looked trendy a decade ago may now feel dated. If your splashback no longer matches your cabinets or countertop, it might be time for an upgrade. Modern splashbacks come in a wide range of colours and finishes, allowing you to instantly refresh your space and bring your kitchen back to life.


3. Stubborn Stains and Discolouration

If grease marks or stains just won’t come off no matter how hard you scrub, it’s a sign that the material has worn out or become porous. Over time, older tiles or cheap plastic panels can absorb stains, making cleaning impossible. Replacing your splashback with a non-porous material like glass ensures effortless cleaning and long-lasting shine.


4. Loose or Peeling Sections

If you notice parts of your splashback pulling away from the wall or peeling at the edges, don’t ignore it. Loose sections can allow moisture to get behind the panels, leading to mould or even wall damage. A fresh installation not only restores your kitchen’s appearance but also ensures proper sealing and protection against moisture.


5. Renovating or Upgrading Your Kitchen

A splashback replacement is often the finishing touch that completes a kitchen renovation. Whether you’re installing new cabinets, changing countertops, or upgrading appliances, a new splashback can tie everything together beautifully. It’s an easy way to elevate your space without a complete remodel.


Final Thoughts

Replacing your kitchen splashback is a simple yet impactful way to update your space and maintain hygiene. From stylish coloured glass to practical acrylic options, modern splashbacks offer endless possibilities.

Explore a wide range of designs and custom options at DIY Splashbacks — your one-stop destination for premium, made-to-measure splashbacks for every kitchen style.


 Related Topics

How to Measure a Splashback Area Yourself

DIY Splashback Installation: Is It Worth It?

Modern vs. Traditional Splashback Designs: Which Fits Your Home?

Small Kitchen? How Splashbacks Can Make Your Space Look Bigger

Small Kitchen? How Splashbacks Can Make Your Space Look Bigger

When it comes to compact kitchens, every design element should serve double duty — functional and aesthetic. The right splashback can do just that, protecting your walls while visually expanding the space. With a few strategic choices, you can transform even the tiniest kitchen into an open, light-filled masterpiece.


1. Reflect Light, Expand the View

Light is the secret weapon of spatial design. The more your surfaces reflect it, the larger your kitchen appears. Glass splashbacks are ideal for this effect. Their glossy surface bounces both natural and artificial light, brightening corners and creating the illusion of depth.

For the ultimate reflection, a mirror splashback can visually double your kitchen space.


2. Choose Light or Neutral Colors

Light and neutral tones are your best allies in creating a sense of openness. Whites, creams, soft greys, and pastels make walls seem farther apart and surfaces more continuous. Pairing a neutral-toned splashback with matching cabinetry keeps visual flow uninterrupted.

👉 Explore a selection of custom-coloured splashbacks at DIY Splashbacks.


3. Create Depth with Patterns or Finishes

A carefully chosen pattern can trick the eye into seeing more depth than actually exists. Textured or metallic splashbacks add subtle variation that draws the eye along surfaces, elongating the room. Horizontal patterns, for instance, make narrow kitchens feel wider and more balanced.


4. Go Seamless and Sleek

In small kitchens, less is more. Seamless glass or acrylic splashbacks eliminate grout lines, giving your walls a clean, uninterrupted finish. This smooth surface enhances light flow and makes the space appear uncluttered and sophisticated.

👉 Check out acrylic splashbacks for a stylish and budget-friendly alternative at DIY Splashbacks.


5. Extend Vertically or Around Corners

Breaking from the norm pays off. Extending your splashback to the ceiling or wrapping it around corners can make your kitchen look taller and more unified. It’s a visual trick that instantly adds height and dimension to the room.


6. Pair with Strategic Lighting

Installing under-cabinet LED lighting or strip lights above your splashback enhances brightness and sparkle. When reflected across a glossy surface, these lights amplify space and create a luxurious, modern vibe — even in compact layouts.


Final Thoughts

Small kitchens thrive on smart design. The right splashback can redefine your space, adding light, continuity, and sophistication. Whether you opt for glass, mirror, or acrylic, your splashback isn’t just a backdrop — it’s a space-expanding feature that makes every square inch work harder.

Explore bespoke splashback options at DIY Splashbacks and reimagine what’s possible in your kitchen today.


Related Reads from DIY Splashbacks

Matching Your Splashback to Your Countertops and Cabinets

Top Splashback Color Trends for 2025

DIY Splashback Installation: Is It Worth It?

What to Expect: The Splashback Installation Process

What to Expect: The Splashback Installation Process

When it comes to elevating your kitchen or bathroom design, a splashback is more than a protective feature—it’s a statement of style and precision. Understanding what goes into the installation process ensures you’re prepared every step of the way. Whether you’re going for glass, acrylic, or crystal, a seamless installation guarantees a flawless finish that lasts for years.

Below is a detailed, step-by-step look at what to expect during your splashback installation journey.


1. Initial Consultation and Measurement

The first step begins with accurate measurement. Professionals or DIY enthusiasts will measure the wall area behind your cooktop, sink, or countertops to determine the exact size and shape of your splashback.

If you’re planning to do it yourself, check out DIY Splashbacks’ measurement guide for a detailed walkthrough. Precision is key here—millimeter accuracy ensures a perfect fit and prevents costly errors during installation.


2. Material Selection and Customization

Once measurements are taken, the next phase is material selection. From toughened glass to acrylic panels or mirror splashbacks, the choice depends on your aesthetic preference and budget.

Visit DIY Splashbacks to explore a range of customisable designs, colour options, and finishes that fit seamlessly with your kitchen’s theme. You can even upload your own image for a bespoke printed splashback.


3. Preparation of the Surface


Before installation begins, the wall must be prepared. The installer will:

Clean the surface thoroughly.

Remove dust, grease, or any old adhesive residue.

Check for unevenness and apply filler if necessary.

This creates a smooth foundation for the adhesive to bond perfectly with the splashback.


4. Fitting and Adhesive Application

Next comes the core of the process—the installation itself. The panel is carefully aligned and fitted using high-strength neutral-cure silicone or splashback adhesive.

For DIY projects, always follow the manufacturer’s instructions. Typically, the splashback is gently pressed into place and supported while the adhesive sets, ensuring no air bubbles form behind it.


5. Finishing Touches

Once the adhesive cures, it’s time for the finishing details:

Seal the edges with clear or colour-matched silicone to prevent moisture from seeping behind the panel.

Polish the surface to achieve a sleek, reflective shine.

Inspect the fit to confirm everything is level and aligned.

These final touches create that polished, showroom-quality look that defines professional craftsmanship.


6. Clean-Up and Aftercare

After installation, the area will be cleaned to remove any excess sealant or fingerprints. It’s best to let the splashback set for at least 24 hours before exposing it to heat or moisture.

To maintain its look, simply wipe it down with a soft cloth and mild detergent—no abrasive cleaners needed.


Final Thoughts

Installing a splashback doesn’t just protect your walls—it transforms your space. Whether you opt for a bold colour, a subtle neutral tone, or a high-gloss mirror finish, the process is straightforward when done correctly.

For more inspiration, explore DIY Splashbacks’ full range of options, from modern kitchen glass splashbacks to custom printed designs that turn your wall into a statement piece.